![]()
Assigning Custom Properties to a Taxonomy
Custom properties let you extend the functionality of taxonomies by creating custom fields to capture additional information. Custom properties act like metadata for taxonomies and categories.
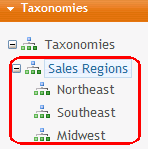
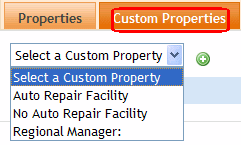
For example, your organization manages a nationwide chain of retail stores. You create a Sales Region taxonomy, where each category represents a different geographic region. Sample categories are northeast, southeast, midwest (as shown below).
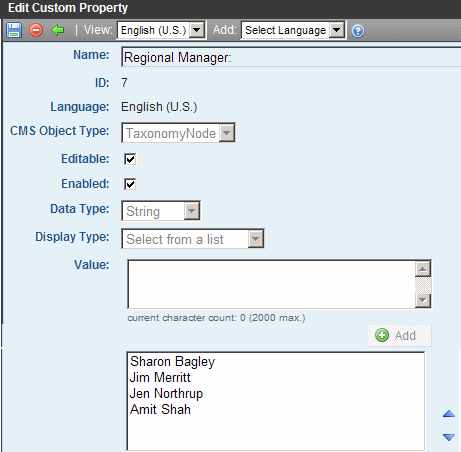
You could create a custom taxonomy property named Regional Manager and use that to create a list of regional managers.
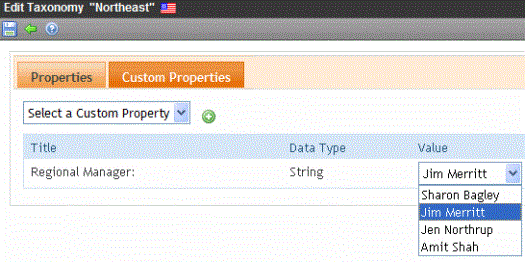
Next, access each region, click the Custom Properties tab, and apply a manager to the region.
Note: Only members of the Administrator User Group can work with custom taxonomy properties.
Creating Custom Taxonomy Properties
To create a custom taxonomy property, follow these steps.
1. Go to the Settings > Configuration > Custom Properties screen.
2. Select the language of the new custom property. You will only be able to apply the custom property to taxonomies/categories in this language.
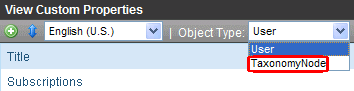
3. From the ObjectType pulldown, click TaxonomyNode (shown below).
4. Click Add ( ).
).
5. The Add Custom Property screen appears.

6. Use the table below to complete the screen.
|
Field |
Description |
|
Enter the custom property name. The name identifies the custom property on the Edit Taxonomy screen's Custom Properties tab (see image below).
|
|
|
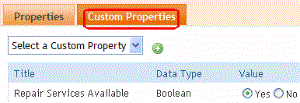
Check this box to allow the user who is applying this custom property to choose a value or edit the default value. Uncheck the box if the user cannot choose or edit the value. In this case, he is only applying the property. If a property is not editable and has several values (type string: select from list or boolean), only the first or selected value is applied to the property. Example of an Editable Custom Property Assume you manage auto parts stores and want a custom taxonomy property to indicate if a car can be repaired at a facility. You create a property named Repair Services Available, and make it boolean and editable. Then, the person applying that custom property to a taxonomy category can choose Yes or No to indicate if repair services are available.
|
|
|
Enabled |
Check this box if this property can be applied to taxonomy categories. If you uncheck this box, this property does not appear on the Edit Taxonomy screen's Custom Properties tab. |
|
Data Type |
Four choices String - a series of characters Boolean - true (yes) or false (no) Numeric - a series of numbers Date - one or more dates selected from a calendar popup screen |
|
Display Type/ Value |
Note: If the Data Type is boolean, select either Yes or No. If the Data Type is String, Numeric or DateTime, you have two choices. Select a single value - the property accepts only one value Select from a list - the property accepts several values. When you choose this option, a lower field appears.
In the top field, insert a value then click Add ( If you want to edit the order of the values, use the up/down arrows (circled above). Note: If Editable is checked and you insert several values, the user applying the custom property can choose the value. If Editable is not checked, the first value is applied to the custom property. |
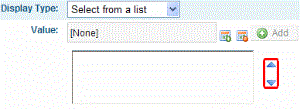
 ). When you do, the value moves to the lower field. Continue until all values are entered.
7. Click Save ( ).
).
Editing a Custom Taxonomy Property
Follow these steps to edit a custom taxonomy property.
1. In the Workarea, click Settings > Configuration > Custom Properties.
2. Select the language of the custom property.
3. From the ObjectType pulldown, click TaxonomyNode (shown below).
4. Click the Title of the custom taxonomy property you want to edit.
5. The Edit Custom Property screen appears.
6. Move to the field you want to change. You can edit these fields:
Name
Editable
Enabled
Value
For descriptions of these fields, see Use the table below to complete the screen.
Note: You cannot edit the ID, Language, CMS Object Type, Data Type, or Display Type fields. If you need to change these fields, delete the custom property and create a new one.
7. Click Save ().
Deleting a Custom Taxonomy Property
If you delete a custom taxonomy property
it remains assigned to all taxonomy categories to which it is assigned
it can no longer be assigned to additional taxonomy categories
Follow these steps to delete a custom taxonomy property.
1. In the Workarea, click Settings > Configuration > Custom Properties.
2. From the ObjectType pulldown, click TaxonomyNode (shown below).
3. Select the language of the custom property.
4. Click the Title of the custom taxonomy property you want to delete.
5. Click Delete ( ).
).
6. A dialog box asks you to confirm .
7. Click OK.
Changing the Order of Custom Taxonomy Property Values
From the Edit Custom Property screen, you can change the order in which the values appear on the Custom Properties tab (see example below)
To set the order of values in a custom taxonomy property, complete these steps.
1. In the Workarea, click Settings > Configuration > Custom Properties.
2. From the ObjectType pulldown, click TaxonomyNode (shown below).
3. Select the language of the custom property.
4. Click the Title of the custom taxonomy property.
5. In the values field at the bottom of the screen, select the item(s) to reorder.
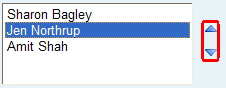
6. Click the Up or Down arrows to move the value up or down.
7. Click Save ().
Multiple Language Support for Custom Taxonomy Properties
Like most Ektron CMS400.NET objects, custom taxonomy properties have a language attribute. Each taxonomy also has a language. You can only apply custom properties to a taxonomy if their languages match.
Translating a Custom Taxonomy Property into Another Language
When creating a custom property, you select its language. See Also: Creating Custom Taxonomy Properties This section describes the procedure for saving a custom taxonomy property in a different language. The new version uses the same ID number as the original language version. You can change the following fields from the original.
Name
Editable
Enabled
Data Type
Display Type
Value
For descriptions of these fields, see Use the table below to complete the screen.
Once you create the new language version, it is no longer linked to the original language version. For example, if you edit or delete the original language version, that action has no effect on the new language version.
The following steps explain how to create a custom taxonomy property in another language.
1. In the Workarea, click Settings > Configuration > Custom Properties.
2. Select the language of the custom property.
3. From the ObjectType pulldown, click TaxonomyNode (shown below).
4. Click the Title of the custom taxonomy property to be created in another language.
5. From the Add pulldown, select the language in which you want to create the custom property.
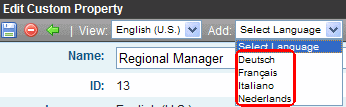
Note: The Add dropdown shows enabled languages for which this custom property does not already exist.
6. Information from the original language property fills the screen as default values. Edit them as desired.
7. Click Save ().


![]()